The example in this procedure adds an Allocation to the product AKLACCLAA01ROH - Superior Room at Citylife Auckland

Allocations can be added from two different places in Product Setup, although the end result is the same
- One is with the Supplier only loaded and
- the other is with the Supplier and Product loaded.
Adding an Allocation
Add an allocation
-
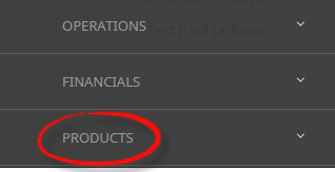
On the Product Setup screen, select menu
 Home > Products > Product Setup.
- Click the Home Menu to expand it:

- Click the Products menu option to expand it:

- Click Product Setup to go to the Product Setup menu:

- Click the Home Menu to expand it:
-
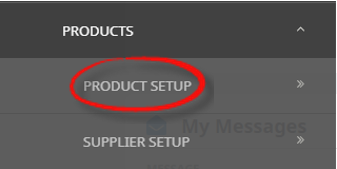
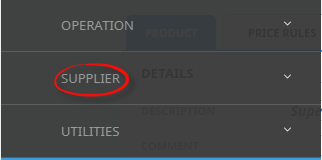
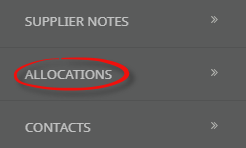
On the Product Setup screen, with the Supplier and/or Product loaded, select menuProduct Setup > Supplier > Allocations.
- Click the Product Setup menu to expand it:

- Click the Supplier menu option to expand it:

- Click Allocations to go to the Allocation screen:

- Click the Product Setup menu to expand it:
-
ClickInsert Allocation.

-
On theInsert Allocation screen, enter Date From, Date To, Name and Description.
NOTE: Dates and Name are mandatory, Description is optional.

- Select allocations by clicking each of the products required under Services and then clicking the grey right arrow (which turns blue when a product is highlighted). Move the required products from Services to Services Included.
-
ClickSave to keep the changes.

NOTE: If Save is clicked, the Add Unit Type screen appears - continue with Add a unit type.
-
ClickExit to discard any changes.


The Insert Allocation screen can be used to insert new allocations, or amend, or delete, existing allocations.
About the Insert Allocation (Setup tab) fields
Allocation Details group
Date From/To (Date)
The dates that the allocation starts and ends on.
NOTE: If there are close out periods that are known prior to setting up the allocation, then there are different methods of handling the allocation set up. One method is to set the end date to the date before the close out and when that allocation has been set up, insert another allocation with the beginning date the day after the close out date. Another method is to insert the allocation, ignoring the close out(s) and then modifying or deleting each close out date as required. The same methods can be used if the allocation quantities vary during the period of the allocation.
Name (15 Chrs)
Enter the allocation name. If there is only one allocation with the supplier then use e.g. the supplier name or "General", "Standard", FIT" etc. If the allocation is for a special event then it should be named as such. There can be unlimited allocation names per supplier and each can be defined for a different range of dates.
If multiple allocations are set against a product Tourplan will use the allocation based on allocation name. It might therefore be useful to use alphanumerical codes like 010 FIT Allocation, 090 Freesale Allocation.
NOTE: The same Allocation name can be used against multiple suppliers; e.g. Run of House, FIT etc.
Description (60 Chrs)
Enter a long description of the allocation.
NOTE: The Allocation Description can be edited/changed after the allocation has been saved.
Flag as Archived (Checkbox)
This checkbox allows the allocation to be archived which will prevent the allocation from being used.
Allocation Type group (Radio Button)
This can be either:
- Supplier General – The allocation will apply to all of the services displayed in the Services Group.
- Option Specific – The allocation applies only to one or a selection of the services displayed in the Services Group.
Services/Services Included group
If the Allocation Type is "Supplier General", then the Left and Right arrows in the Services list will be dimmed-out. To include a Service that can use the Allocation, highlight it in the list of Services and click the right arrow (>) to move it to the Services Included list.
To remove a service from the Services Included list, highlight the service and click the left arrow (<).
Add a unit type
-
On theAdd Unit Type screen, select a Unit Type from the drop-down list.

- Check the Date From and Date To dates - they can be changed here if necessary.
- Make whatever selections are required to days of the week listed in the Apply To group and select Sub-Allocations by clicking in the checkbox alongside each sub-allocation.
- Enter values into the Max and Release fields for an allocation quantity applying for each sub-allocation and the release period prior to use (in days).The Save button remains dimmed until values are entered into these fields.
- Uncheck the RQ checkbox if the allocation cannot be sold on request, otherwise leave it checked.
-
ClickSave to keep the changes.
NOTE: If Save is clicked, the Allocation Detail screen appears - continue with Add allocation detail.
At this point, the allocation has not yet been saved. -
ClickExit to discard any changes.
About the Add Unit Type fields
Unit Type (Drop-down)
Click the drop-down to display a list of Unit Types and select one from the list.
NOTE: The Unit Types must have been previously defined in Allocations - Introduction, Allocation Units.
Date From/To (Date)
These dates are inherited from the date fields on the 'Insert Allocation' screen.
Apply To Group
NOTE: All settings in these fields will apply to all dates and days in the allocation. If a few specific date(s) have different settings, these can be edited/changed on a date by date basis once the allocation has been created.
Days of the Week Section (Checkboxes)
By default the allocation will be created for all days of the week. Uncheck any days of the week which this allocation will not apply to.
Sub-Allocation Specifics Section
If the allocation is going to be split over several Sub-Allocations, click the checkbox next to the sub-allocation name. When Sub Allocations are selected, the Max, Release and RQ fields become active.
NOTE: The Sub Allocations must have been previously defined in Allocations - Introduction, Allocation Splits (Sub-Allocations),
Max (Numeric 6.0)
Enter the maximum allocation quantity applying for each sub-allocation. (e.g. number of rooms, seats etc.).
Release (Numeric 6.0)
Enter the release period prior to use (in days). This value is used to prevent the allocation being used inside the release period and to calculate the Release Report.
RQ (Checkbox)
Uncheck this box if allocation cannot be sold on request.
There is a total allocation of 11 rooms per night, and these have been split across 4 sub allocations. All have a 14 day release period and all are available to be sold on request when the allocation has been used up.

Add allocation detail
-
On theAllocation Detail screen, if no further changes are required, click Exit to save the allocation.

- If changes are required review fields Max, Release and the RQ checkbox and make changes.
NOTE: No other fields on this screen can be changed.
-
ClickSave to keep the changes.

About the Allocation Details fields
The only editable data on this screen are the values in the Max, Release and the RQ checkboxes in the columns under each of the Sub-Allocation names (in the example, sub-allocations visible are General and T1 - a user would scroll right to see the others). The values in the "Total" columns cannot be changed - they will update automatically when the sub-allocation data is changed. This screen can be accessed at any time and the values altered as required.
The columns show (for each subscribing Sub-Allocation and the Total) the Maximum quantity available; the Used Quantity and the balance Available.
The rows show the day by day Maximum, Used and Available quantities for each Sub-Allocation.
NOTE: If a date (or dates) are closed out subsequent to the allocation being created, set the Max on the applicable dates to 0.
NOTE: Allocation Splits (Sub Allocations) and later dates are able to be viewed by clicking/dragging the scroll bars at the bottom and right of the screen.
Add Type Button
Editing of the allocation can occur using the Add Type Button seen within the Days tab. This allows direct access back to the Add Unit Type screen for additional Unit Types to be included in this allocation.
Archiving Allocations
Allocations can be flagged as archived, which allows existing bookings using the allocation remain, however any future bookings the allocation will not be visible to used.
Archiving an Allocation
- Open the Allocation.
- Click on the Setup Tab.
-
Select theFlag as Archived check box.
